Irresistible Tiramisu Truffles Recipe
Introduction
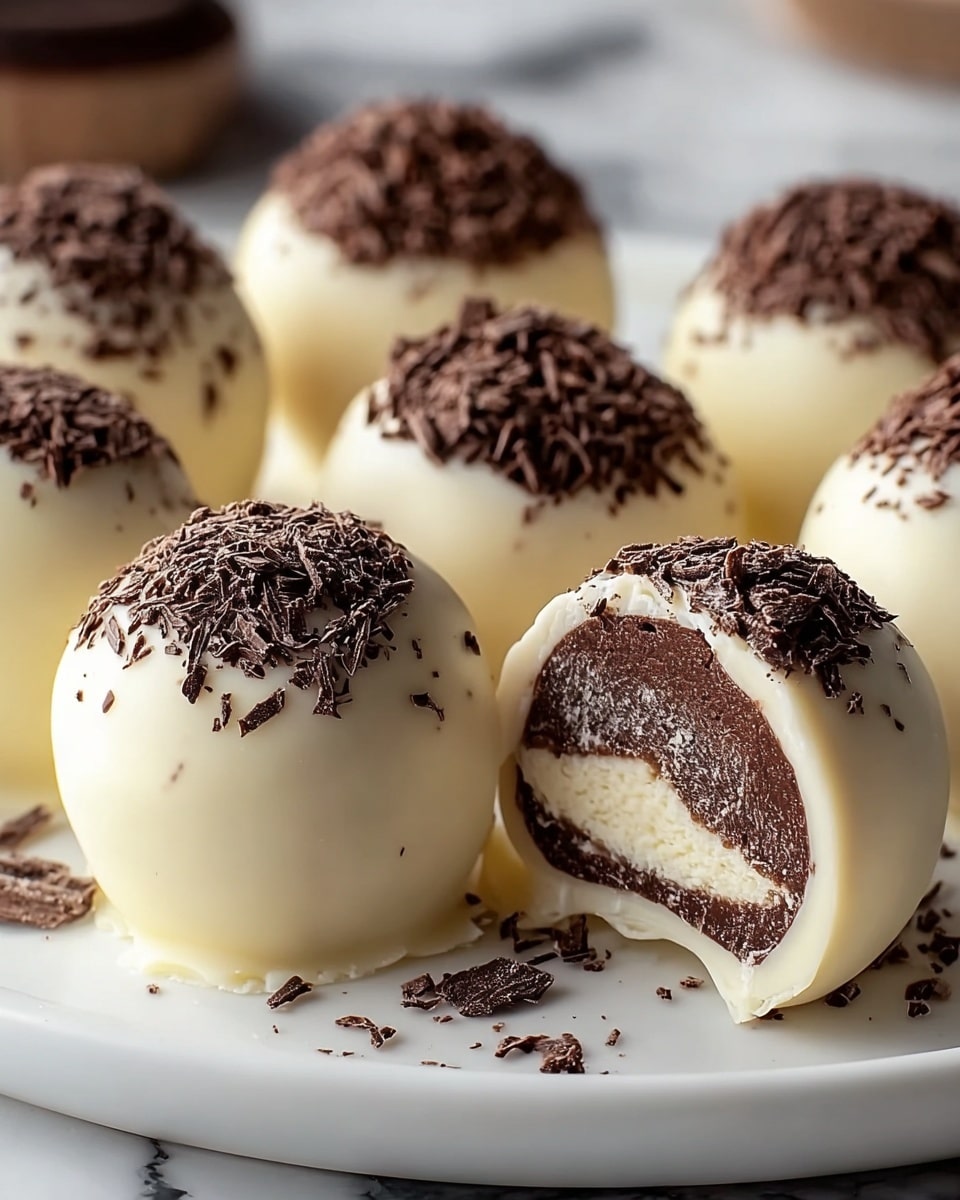
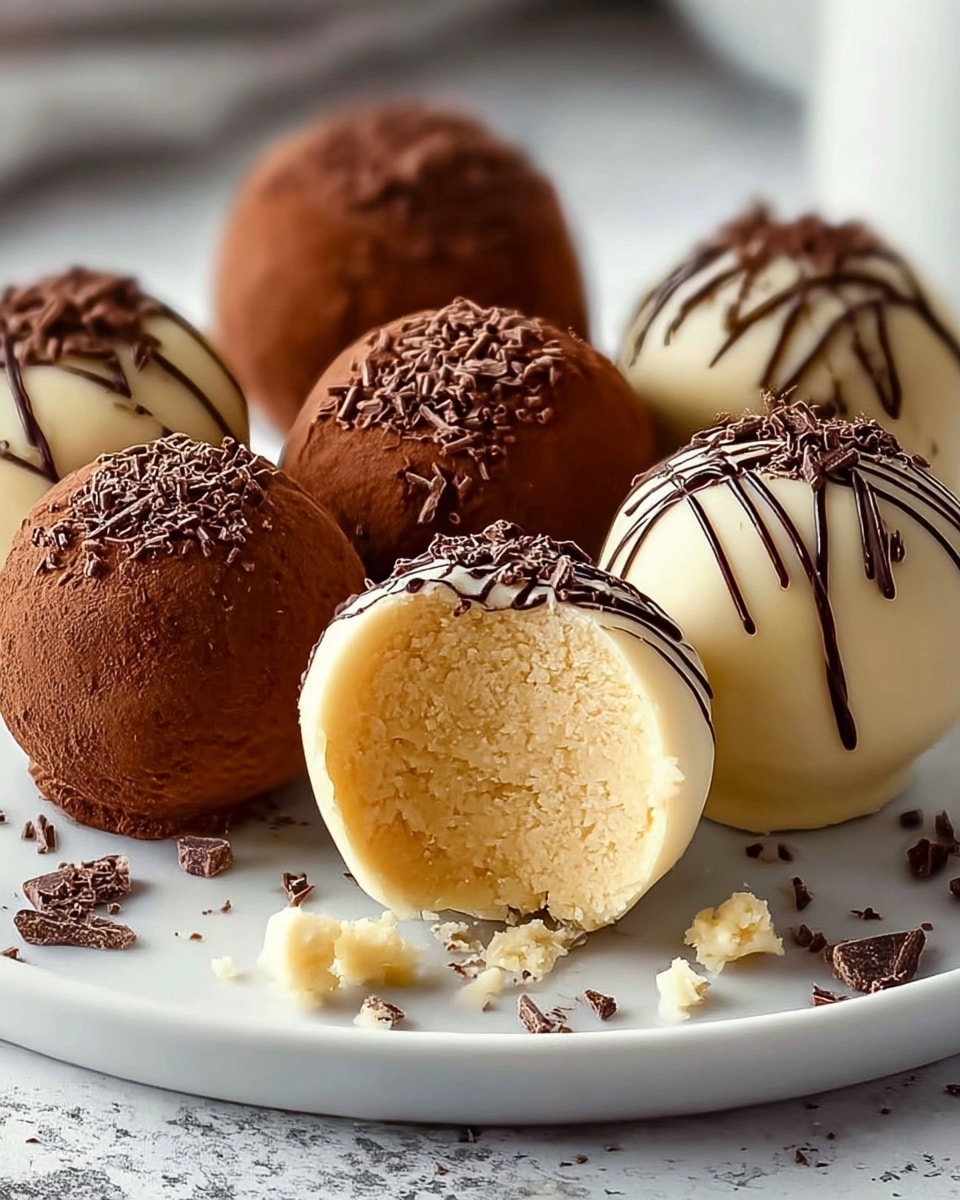
These irresistible tiramisu truffles capture the classic flavors of the beloved Italian dessert in a bite-sized treat. Creamy mascarpone, espresso-soaked ladyfingers, and rich chocolate come together to create an elegant and delicious indulgence perfect for any occasion.
Ingredients
- 1 cup mascarpone cheese
- 1 1/2 cups crushed ladyfingers (Savoiardi)
- 2 tablespoons espresso or strong coffee
- 1/2 cup powdered sugar
- 1 teaspoon vanilla extract
- 1 1/2 cups dark or semi-sweet chocolate (melted)
- 2 tablespoons unsweetened cocoa powder (for dusting)
Instructions
- Step 1: In a mixing bowl, combine the mascarpone, crushed ladyfingers, powdered sugar, espresso, and vanilla extract. Mix until a thick dough forms.
- Step 2: Cover the mixture and refrigerate for 1 to 2 hours to allow it to firm up.
- Step 3: Once chilled, scoop and roll the mixture into 1-inch balls. Place them on a parchment-lined tray and chill again for 30 minutes.
- Step 4: Melt the chocolate. Dip each truffle using a fork, letting excess chocolate drip off before placing them back on the tray.
- Step 5: Dust the truffles with cocoa powder before the chocolate fully sets. Allow them to harden completely at room temperature or chill briefly to set faster.
Tips & Variations
- Make sure your mascarpone is cold for easier rolling and better texture.
- If the dough feels too soft, add more crushed ladyfinger crumbs to firm it up.
- Try using flavored coffee or add a splash of coffee liqueur for an extra layer of flavor.
- For a crunchy center, place a coffee-soaked espresso bean or hazelnut inside each truffle before dipping in chocolate.
Storage
Store tiramisu truffles in an airtight container in the refrigerator for up to 4 days. For longer storage, freeze them in a single layer on a tray before transferring to a sealed container; they can be frozen for up to 1 month. To enjoy, thaw in the refrigerator for a few hours before serving. Reheating is not recommended.
How to Serve
Serve this delicious recipe with your favorite sides.
FAQs
Can I use regular coffee instead of espresso?
Yes, strong brewed coffee works well as a substitute for espresso, though espresso provides a more intense flavor.
How do I prevent the truffles from sticking to my hands while rolling?
Keep your mascarpone chilled and slightly dampen your hands with cold water to make rolling easier and prevent sticking.
PrintIrresistible Tiramisu Truffles Recipe

These Irresistible Tiramisu Truffles are a delightful no-bake treat combining the creamy richness of mascarpone with the coffee-soaked crunch of ladyfingers, coated in luscious dark chocolate and dusted with cocoa powder. Perfect for dessert lovers craving the classic flavors of tiramisu in a convenient bite-sized form.
- Prep Time: 15 minutes
- Cook Time: 0 minutes
- Total Time: 2 hours 45 minutes
- Yield: About 20 truffles 1x
- Category: Dessert
- Method: No-Cook
- Cuisine: Italian
Ingredients
Main Ingredients
- 1 cup mascarpone cheese
- 1 1/2 cups crushed ladyfingers (Savoiardi)
- 2 tablespoons espresso or strong coffee
- 1/2 cup powdered sugar
- 1 teaspoon vanilla extract
- 1 1/2 cups dark or semi-sweet chocolate (melted)
- 2 tablespoons unsweetened cocoa powder (for dusting)
Instructions
- Mix the dough: In a mixing bowl, combine the mascarpone cheese, crushed ladyfingers, powdered sugar, espresso, and vanilla extract. Stir until a thick, uniform dough forms that holds together well.
- Chill the mixture: Cover the bowl with plastic wrap and refrigerate the mixture for 1 to 2 hours to allow it to firm up, making it easier to handle for rolling.
- Form truffle balls: After chilling, scoop the dough into 1-inch portions and roll them into smooth balls. Arrange the truffles on a parchment-lined tray and place them back in the refrigerator for 30 minutes to set.
- Coat with chocolate: Melt the dark or semi-sweet chocolate using a double boiler or microwave. Using a fork, dip each truffle into the melted chocolate, allowing the excess to drip off before placing them again on the tray.
- Dust with cocoa powder: While the chocolate is still wet, dust each truffle lightly with unsweetened cocoa powder to impart a classic tiramisu flavor and finish. Let the chocolate coating harden completely at room temperature or chill briefly before serving.
Notes
- Ensure the mascarpone cheese is cold; this helps in easier rolling of the dough into balls.
- If the mixture feels too soft, add more crushed ladyfinger crumbs to achieve the right consistency.
- Store the truffles in an airtight container in the refrigerator, or freeze in a single layer for longer storage.
Keywords: tiramisu truffles, no-bake desserts, mascarpone truffles, coffee desserts, chocolate coated truffles, Italian desserts