No Bake Mini Biscoff Cheesecakes Recipe
Introduction
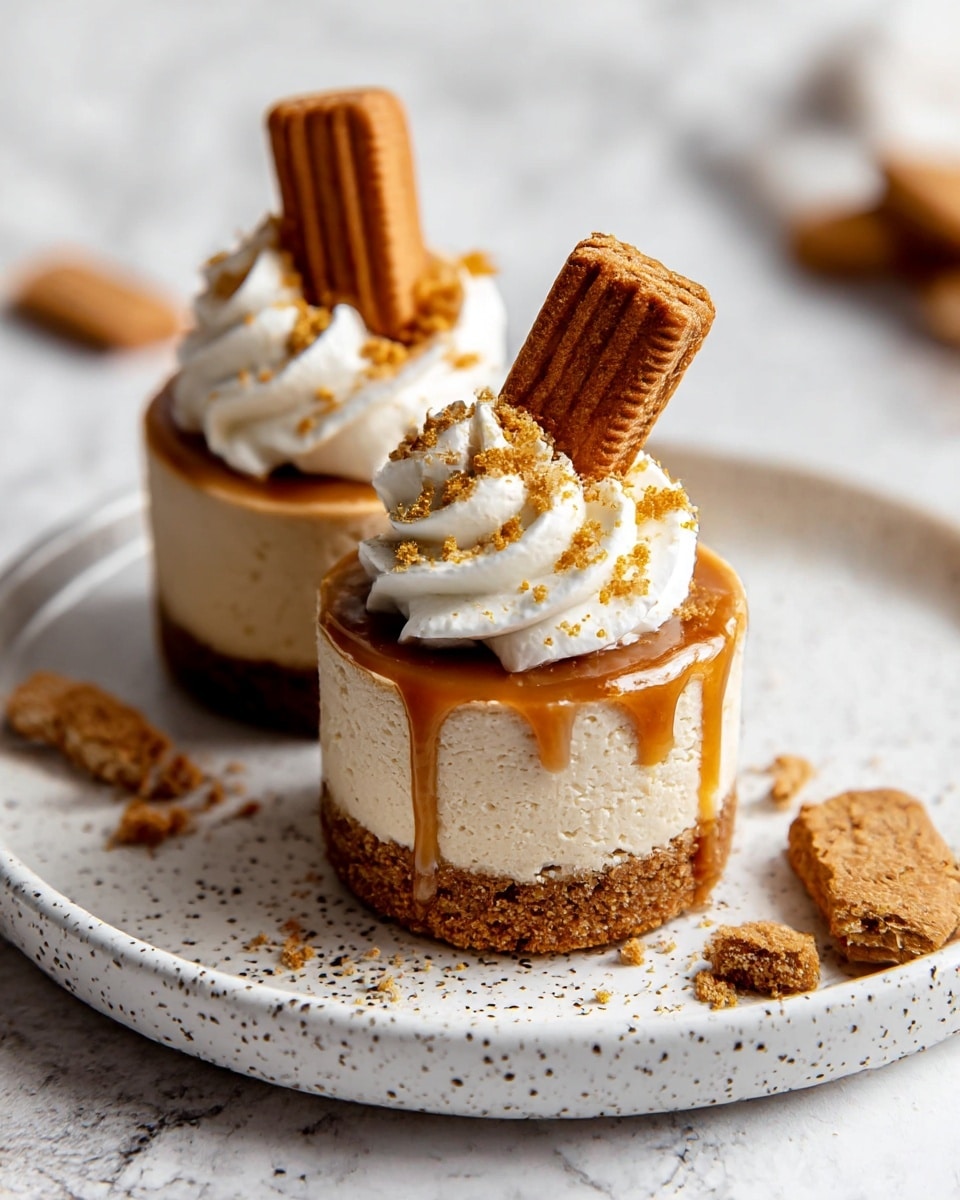
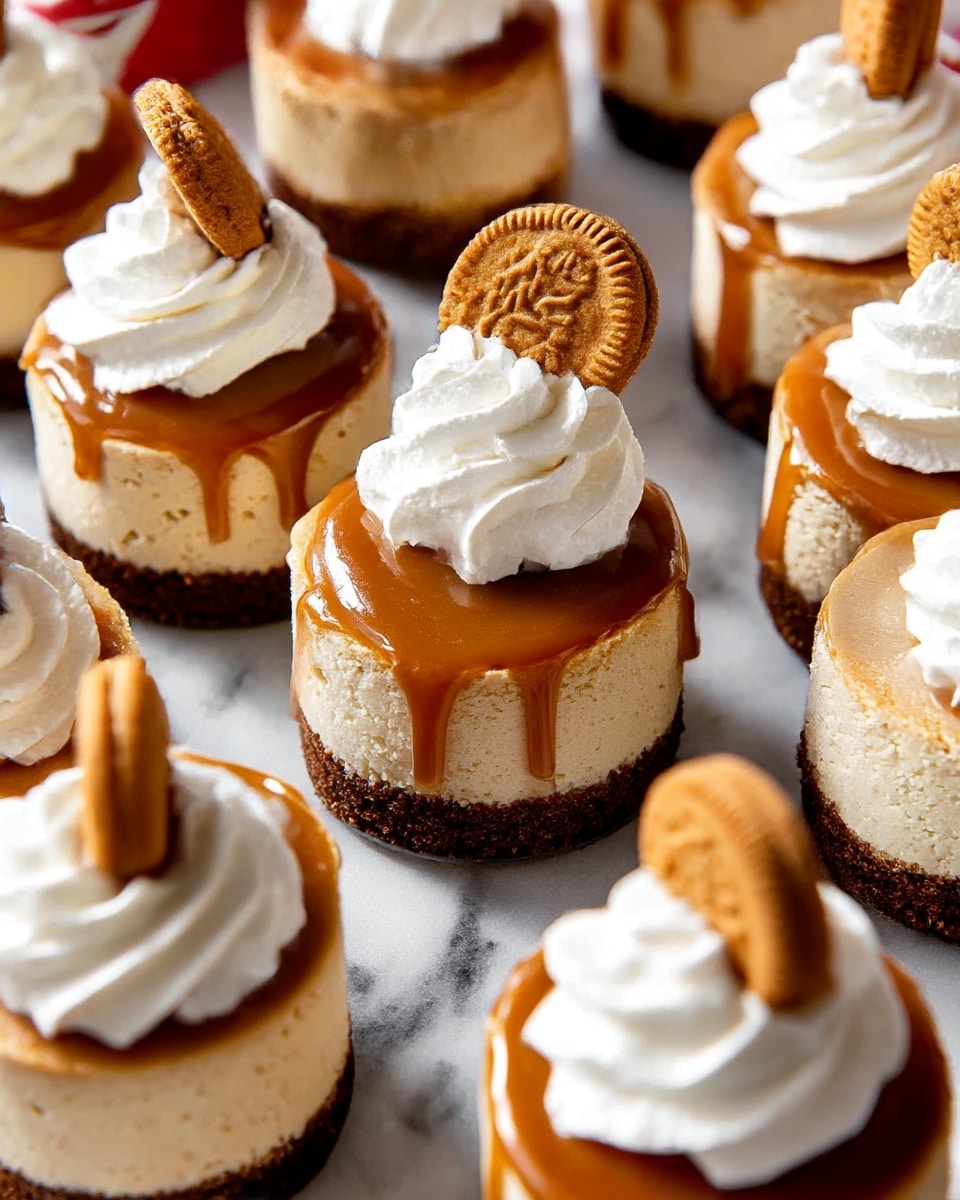
These No Bake Mini Biscoff Cheesecakes are creamy, rich, and incredibly easy to make. Featuring a crunchy Biscoff cookie crust and smooth Biscoff-flavored filling, they are the perfect individual dessert for any occasion.
Ingredients
- 1 (8.8 oz, 250g) package Biscoff cookies
- 1/2 cup melted butter, unsalted
- 1 cup heavy cream, cold
- 3 (8 oz) blocks full-fat cream cheese, softened to room temperature
- 1 cup powdered sugar
- 1 cup creamy Biscoff cookie butter
- 1/3 cup sour cream, room temperature
- 2 tsp pure vanilla extract
- Pinch of salt
- 1/2 cup creamy Biscoff cookie butter (for topping)
- Additional Biscoff cookies for garnish, whole or crushed
- Whipped cream (optional, for serving)
Instructions
- Step 1: Blitz the Biscoff cookies in a food processor until finely ground. Slowly stream in the melted butter until the mixture is combined and sandy but holds together when pressed.
- Step 2: Spray 2 mini cheesecake pans with non-stick spray or line 2, 12-count muffin pans with cupcake liners. Press about 1 tablespoon of the crumb mixture into each pan. Freeze or refrigerate while preparing the filling.
- Step 3: Using a hand mixer or stand mixer with a whisk attachment, beat the cold heavy cream in a chilled bowl until stiff peaks form, about 2 minutes. Be careful not to overbeat. Refrigerate until ready to use.
- Step 4: In a separate large bowl, beat together the softened cream cheese, powdered sugar, Biscoff cookie butter, sour cream, vanilla extract, and a pinch of salt until smooth and fully combined.
- Step 5: Gently fold the whipped cream into the cream cheese mixture with a rubber spatula until no white streaks remain.
- Step 6: Spoon the filling into a piping bag fitted with a round 1A tip and pipe the filling evenly onto the chilled crusts. Smooth the tops flat.
- Step 7: Refrigerate the cheesecakes for at least 6 hours or overnight, loosely covered.
- Step 8: Melt the 1/2 cup of Biscoff cookie butter in the microwave for 20-30 seconds until runny. Spread it over the tops of the cheesecakes, allowing it to drip down the sides. Return to the refrigerator for 15-20 minutes until set.
- Step 9: Garnish with additional Biscoff cookies and whipped cream if desired before serving.
Tips & Variations
- Use full-fat cream cheese for the best creamy texture.
- For extra crunch, sprinkle crushed Biscoff cookies on top before the final chill.
- Substitute sour cream with Greek yogurt for a tangy twist.
- If you don’t have a piping bag, simply spoon the filling carefully onto the crusts.
Storage
Store these mini cheesecakes covered in the refrigerator for up to 3 days. They can also be frozen for up to 1 month—thaw overnight in the fridge before serving. Reheat topping slightly if it firms up too much.
How to Serve
Serve this delicious recipe with your favorite sides.
FAQs
Can I make these cheesecakes ahead of time?
Yes, they taste even better after resting overnight. Prepare and refrigerate them up to a day before serving.
Do I need special pans for mini cheesecakes?
You can use mini cheesecake pans or simply line muffin pans with cupcake liners to create individual portions easily.
PrintNo Bake Mini Biscoff Cheesecakes Recipe

No Bake Mini Biscoff Cheesecakes are delightful, creamy mini desserts featuring a crunchy Biscoff cookie crust and a rich, fluffy filling infused with Biscoff cookie butter. Perfectly smooth and topped with a glossy layer of melted Biscoff spread and optional whipped cream or cookie garnish, these individual cheesecakes require no baking and come together quickly, making them an indulgent treat for any occasion.
- Prep Time: 20 minutes
- Cook Time: 0 minutes
- Total Time: 6 hours 20 minutes
- Yield: 24 mini cheesecakes 1x
- Category: Dessert
- Method: No-Cook
- Cuisine: American
Ingredients
Crust
- 1 (8.8 oz, 250g) package Biscoff cookies
- 1/2 cup melted unsalted butter
Filling
- 1 cup cold heavy cream
- 3 (8 oz. blocks) full-fat cream cheese, softened to room temperature
- 1 cup powdered sugar
- 1 cup creamy Biscoff cookie butter
- 1/3 cup sour cream, room temperature
- 2 tsp pure vanilla extract
- Pinch of salt
Topping
- 1/2 cup creamy Biscoff cookie butter
- Additional Biscoff cookies (whole or crushed) for garnish
- Whipped cream (optional)
Instructions
- Prepare the crust: Blitz the Biscoff cookies in a food processor until they are finely ground. Gradually stream in the melted butter and pulse until the mixture is sandy but holds together when pressed.
- Form the crust base: Spray two mini cheesecake pans (or two 12-cup muffin pans lined with cupcake liners) with non-stick spray. Press about 1 tablespoon of the crumb mixture into each pan evenly to form the crust. Place the pans in the refrigerator or freezer to chill while preparing the filling.
- Whip the cream: In a chilled medium bowl or stand mixer with a whisk attachment, beat the cold heavy cream until stiff peaks form, about 2 minutes. Be careful not to overbeat. Refrigerate the whipped cream until ready to fold in.
- Mix the filling base: In a large mixing bowl, beat together the softened cream cheese, powdered sugar, Biscoff cookie butter, sour cream, vanilla extract, and a pinch of salt until the mixture is smooth and fully combined without lumps.
- Incorporate whipped cream: Gently fold the whipped cream into the cream cheese mixture using a rubber spatula. Work carefully until no white streaks remain, ensuring the filling is light and fluffy.
- Fill the cheesecake pans: Transfer the filling into a piping bag fitted with a round 1A tip. Pipe the filling evenly onto the chilled crusts in each mini cheesecake pan. Smooth the tops with the spatula for an even surface.
- Chill the cheesecakes: Refrigerate the cheesecakes for at least 6 hours or preferably overnight to set completely. They can be loosely covered during this time.
- Prepare the topping: Melt the 1/2 cup of creamy Biscoff cookie butter in the microwave for 20-30 seconds until smooth and pourable. Spread this melted cookie butter evenly over the tops of the chilled cheesecakes, allowing it to drip slightly down the sides.
- Final chill and garnish: Return the cheesecakes to the refrigerator for 15-20 minutes until the topping firms. Garnish with additional whole or crushed Biscoff cookies and whipped cream if desired before serving.
Notes
- Make sure the cream cheese is fully softened to room temperature for a smooth filling.
- Do not overbeat the heavy cream to avoid turning it into butter.
- Using a piping bag helps achieve a neat and professional-looking cheesecake surface.
- The mini cheesecake pans or cupcake liners help with easy portioning and removal.
- Refrigeration time is important for setting the cheesecakes properly before adding toppings.
- Store leftovers covered in the refrigerator for up to 3 days.
Keywords: No bake cheesecake, Biscoff cheesecake, Mini cheesecakes, Biscoff cookie butter dessert, Easy no bake dessert, Cream cheese dessert